

This week, i came across an automation testing concept called Visual Regression Testing from my senior. He shared his experience using BackstopJS in TestProject. You can checkout all about it here BackstopJS .
As i was browsing through Test Automation University to pick up something new to learn on holidays, i stumbled upon a tutorial on Automated Visual Testing with Python that uses Applitools Eyes SDK. This immediately caught my eyes as it was related to the Visual Regression Testing concept.
Table of contents 📝
1.What problem does Applitools Eyes solves?
2. How to setup Python 3 environment in your machine?.
#—> Mac OS Catalina
#—>Windows and Linux
3. How Applitools Eyes works?
#—>Setting up and running
#—>Setting baseline
#—>Running the test
4. Intergrations
5. Summary
What problem does Applitools Eyes solves?🤠🛠️
Applitools Eyes is a tool that helps testers to perform automated visual testing. Applitools reduces manual testing efforts significantly by leveraging the power of AI image comparison technology where it can be set to capture bugs that are perceivable to normal human eyes while ignoring machine level details that might cause flaky test results.
How to setup Python 3 environment in your machine? 🐛
Mac OS Catalina 🤦
Those who have been using Catalina a while knows that the permission and access issues can be annoying. Setup of Python 3 has not been spared too. To save you all that trouble, i would like to share my personal favourite article that helped me to swim through the access issues and understand the good and bad practices. You can click on the url. The right and wrong way to set Python 3 as default on a Mac.
Windows and Linux 🕺
Many have referred to this website, The Hitchhiker’s Guide to Python, for setup in Windows and Linux. I have not tried setting up Python 3 in Linux and Windows. So feel free to checkout the link above or others resources that you might know.
How Applitools Eyes Works? 🤔
For detailed step by step guide, i would recommend you to visit and try the free course at Test Automation University your self. In this article however, i will share my overview experience of using this tool based on that tutorial.
I use PyCharm CE as the IDE of choice for Python automation framework
Cool Note 💡
Setting up and running 🏃♂️
- First, you need signup for free account in Applitool. Then you need to get the API key from profile settings. You will be using this API key later to add it into the config file in your automation framework.

2. For sample reason, i have created a file structure automation>base.py .
Inside here, create a variable called APPLITOOLS_API_KEY and assign it with the API key which we copied from Applitools dashboard just now .

3. Now we need to initialise the chrome driver and applitools eyes. So in the file structure of automation>tests>conftest.py , i have added these lines of codes.
We can define the fixture functions in conftest.py to make them accessible across multiple test files
Cool Note 💡


4.Next need to write functions to interact with the sample bookstore website where it will search for a book. The search result will be used to do image comparison. So in the file automation>page_objects>search_page , i added the following code.

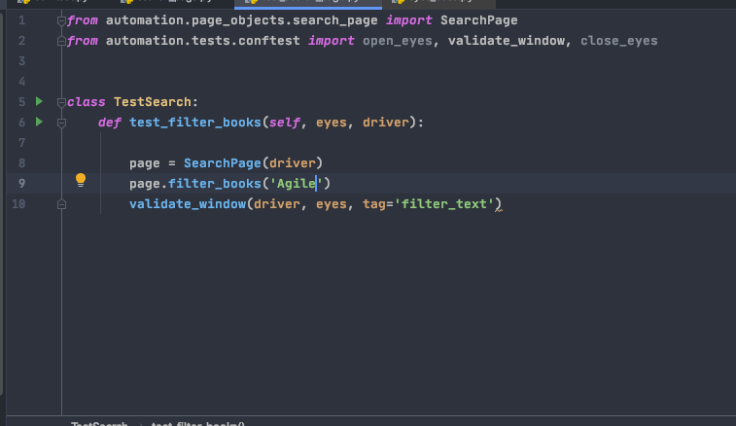
5. Finally, we will write the test case to call the functions. automation>tests>chapter_05>test_search_page.py

That’s it! Now we can run the test case. Ermm but not so fast. We haven’t set the baseline image yet.
Setting baseline 👷♂️
In order to set the baseline, you will need to run the test once. Once its pass, you need to go to Applitools website and view the dashboard to set the baseline.
Dashboard view

You can now see the test_filter_books. Click on the preview box and you will see the screen below. The left side of the screen is the baseline. The right side is the checkpoint, which is the search result we want to compare. For the first time, you will not have a baseline. So you would want to set the baseline image by giving the checkpoint image a thumbs up and clicking save on the top right button. If no changes required, you can leave it as it is.

Running the test 🙌🏻
Now that we have already set the baseline image, we can run the test! In this run, we are expecting the test to pass since the search result image will be the same as the baseline image.

As you can see above, it auto-passed the test. Now let’s run the test for fail. I will change the search param with “Agile” instead of “James“. We are expecting the test to fail as the baseline image is different from the search result this time.
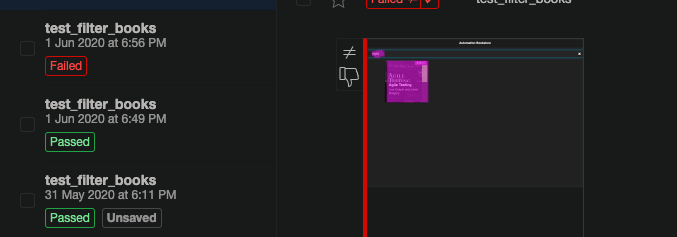
If you tried running this, your test would have failed with an error ../../../venv/lib/python3.7/site-packages/applitools/core/eyes_base.py:292: DiffsFoundError .
DiffsFoundError means the “eyes” have detected some differences in the result image against the baseline. In Applitools dashboard, you will be seeing test status as unresolved.

All you need to do now is simply verify the image if it is acceptable to you. For this test case, it is totally unacceptable as it is a totally a different book!

So we will give it a thumbs down and system will auto mark as fail.
That’s it! As simple as that! Of course there are many more tweaks and functionalities such as reporting to discuss about but i don’t want to make this article into full fledge user manual. So do tinker around with it 😉
Integrations 🚀
Applitools Eyes offers many types of web and mobile SDKs. They support popular programming languages such as Java, Ruby and Python!


They also offer integrations for other services such as GitHub, CircleCi, Azure DevOps and many more cool stuffs!

Summary ⏳
Overall , i find Applitools Eyes as an awesome tool for Visual Regression Testing. They offer free version for 100 checkpoints monthly up to 3 users on top of CI/CD integration.
I’m set to explore more Applitool Eyes alongside with other Visual Regression Testing tools as well. Will keep ya’l posted for more cool stuffs!
Thanks for reading! Hope you have learned about Applitool Eyes. See ya’l on my next short learning series! 😎 ♊︎
QA Automation Engineer at Fave
